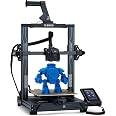
🚀 Elevate Your Printing Game with the Neptune 3 Pro!
The ELEGOO Neptune 3 Pro is a cutting-edge FDM 3D printer featuring a large printing size of 8.85x8.85x11 inches, auto bed leveling for precision, and a dual-gear direct extruder for enhanced filament feeding. With a noise level as low as 47-48dB, it offers a quieter printing experience. The printer is compatible with various materials and comes with a user-friendly setup, making it ideal for both beginners and experienced users.


| Color | Black |
| Enclosure Material | Aluminum |
| Item Weight | 22 Pounds |
| Item Dimensions D x W x H | 23"D x 9"W x 19"H |
| Connectivity Technology | USB |
| Compatible Devices | Laptop, Personal Computer |
| Power Consumption | 360 Watts |
| Operating System | OS X 10.11 El Capitan, Linux, Windows 10 |
| Compatible Material | Polyethylene Terephthalate Glycol, Polylactic Acid, Acrylonitrile Butadiene Styrene, Thermoplastic Polyurethane |
| Printing Technology | FDM |
| File Format | STL |
| Voltage | 110 Volts |
M**R
This is a great machine
I’ve only had a short time. I have zero prior experience with 3D printing. Once received, I watched many many YouTube videos. Setting up the machine. Using the supplied modified for this machine, Cura software. I have download some EZ to print from Thingiverse. Learned I had to extract the files. Then move the object to print onto the Cura print platform. Sometimes rotate the object on the Cura platform. Slice it, save to a removable microSD card. Make sure to click the pencil icon at bottom left of Cura screen and name it what you want before saving to the microSD card. Then insert card into the printer. I use nozzle temp 220 and plate 70. I only print one object at a time, unless small and I can place very close to each other in the Cura platform before I slice and save to microSD card. The Amolen silk shiny PLA is very nice to print great definition and to remove from plate when finished printing. Let it cool before removing. The Elegoo PLA works, but just not as nice. I use the full auto level between different objects. I try to print 3 of same objects before I do a full re level. I’ve discovered to check nozzle distance to plate after each full leveling. I run a sheet of typing paper under nozzle and adjust so there is a good drag. I first did not adjust nozzle close enough. I learned. I adjusted my Cura for a wide brim for greater adhesion of piece as it prints.watch YouTube for this. I watch carefully first several minutes to be sure the filament is lying down good. If not , i stopped , cleared away the mess, and did full leveling and nozzle distance adjustment. I watched a lot of YouTube videos. Once I decided to spend time in leveling, nozzle distance and set my nozzle and bed temperature up, it’s been really great pieces printed. Watch many YouTube videos as you learn about each aspect. After one or two days commitment to basic learning and adjusting your routine, you will be very happy with this machine. Take the time and learn. This is a great machine and overall satisfying little hobby. UPDATE. I have been using for awhile. GREAT MACHINE. I have printed many different items. All came out great. Make sure your bed heat is high enough and bed is thoroughly heated. Watch the first several layers, get in there with a flashlight. If not laying down perfectly. Stop and clear it out and start over. I’ve only needed to do this twice. This machine is a pleasure to use. Great Great! UPDATE. I’ve been using almost daily, running all night, for a little over 2 months. STILL GREAT. I’ve used ThingIVerse and also bought STL files, from Etsy. Dinosaurs, Astronaut, Furby, Candy dispense using mason jar, squishy turtles, many variations of whistles, Recorder, Bird shaped multi tone whistles, many different key fobs, pull helicopters, lots more, many items. Nozzle 220 and bed 70. Keep nozzle height low, a sheet of typing paper has pretty good friction to pull out, but not too tight either.Now a situation. My nozzle got clogged. I YouTube it. Easiest is replace it. Two extra came with the machine. Extras look inexpensive. YouTube has a very simple method to replace with needle nose pliers and 6mm socket. EZ and quick. Runs perfect after I did that. I think I’ll change that every month, just to be sure I don’t have a clog during a print job. This machine is simple to use. You MUST perform the total automatic re leveling of the bed before each print job. I’ve been disappointed when I skipped this. Great Quiet Simple machine that produces perfect items easily!! You can spend more money, but if you want a simple to use , reliable machine, BUY THIS.
T**T
The best machine, with mindful use
My new HP copier died. This machine did not.This elegoo printer is the best affordable and high quality intro to 3D printing. The parts provided, tools, and starter filament are all fantastic.I am another one to say that it did work straight out of the box and producing high-quality prints though results may vary. Because of the nature of the printing experience, it’s very important to understand fundamentals of how the machine works, and make sure certain things are adjusted properly and certain things are tightened. Regular maintenance of the machine would be recommend.I’ll begin now with faults here which are related to the setup. The setup of the machine and use is not fully detailed in the manual. There are several things to pay attention to, that’s not in the manual. For instance, they don’t tell you that the build plate is magnetized onto the machine and you remove it after a print and the bed cools, then you flex the plate to get your print job off. Took me a good moment to find this out.Other things left out are related to setup and maintenance. Do research on the machine before you get it, and you’re certainly more likely to have a good printing experience.It also does have a couple software faults maybe to keep aware of. I had a print job fail to resume after pressing pausing it. And I’m not sure if it had anything to do with how my model gcode was written by the slicer.Also keep aware, be sure to remove your model after a print. Further actions you might take after you return to the home screen are not aware of whether any material is still on the build plate. So if you’re not careful, you could run the print head into your build and destroy things including the printer.Furthermore, the machine is not WiFi connected and I thought it was supposed to be. I’ll have to check on that later, however it still does have an Ethernet jack.Now onto print fails. Running the printer at high speed is nice, but it can introduce problems in both the machine and prints. Be sure to upgrade the machine maybe if you want super high speed like advertised and use a high speed filament. The servo motors can do it though. My other fail is possibly from a bad slice from Cura slicer. Cura provided a warning about the STL I was printing, so I’m assuming that the print issue there was not related to the printer itself.Lastly, the auto bed leveling is working well. It took time because some of it is still manual. Again, experience may vary and do your research.Overall, as a first time user, I’m extremely satisfied because I’m a user that understands nothing is perfect and overall, elegoo has put out a noteworthy milestone in 3D printing.I’ve also attached a photo of my 3D benchy for reference of print quality
Trustpilot
3 weeks ago
1 month ago