🚀 Elevate Your 3D Printing Experience!
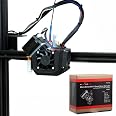
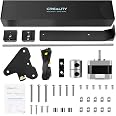
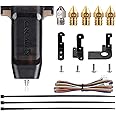
The Micro Swiss NG™ Direct Drive Extruder is a drop-in upgrade for Creality CR-10 and Ender 3 series printers, featuring a high torque 3:1 gear ratio and the industry's shortest filament path. This complete kit includes all necessary components for an easy installation, enhancing your printing capabilities with a compact and efficient design, all proudly made in the USA.


| Item Dimensions D x W x H | 4.75"D x 4.75"W x 2.62"H |
| Printing Technology | FDM |
| Operating System | Windows XP |
| Compatible Devices | Laptop, Smartphone |
| Enclosure Material | Aluminum |
B**B
High quality, great for flexible filaments
A bit on the pricey side considering the machines it's designed for, but you certainly get what you pay for and I'm kinda attached to my little workhorse ender 3 lol. It's very easy to install in about an hour and the instructions are clear. Looks and feels very well made, original hardware feels like a toy by comparison. I have about 50 hours of use on it so far and it's working great for me.
M**K
Amazing Ender 3 upgrade
Night and day difference in terms of print quality and reliable printing, compared to the stock hotend, particularly for PETG. It is a beautiful piece of engineering.Since their instructions are more Marlin based, here is my Klipper installation experience:* Installed on an Ender 3 Pro / Klipper setup. Installation was straightforward. BTW - I hated messing with Marlin, and I am a software engineer, but find working with Klipper so easy.* Performed "e-step" calibration. They suggest starting with 8 for rotation_distance, I ended up at 7.8.[extruder]rotation_distance: 7.8 #microswiss* Adjusted the XY offset for BLTouch[bltouch]x_offset: -40y_offset: -10* Performed hot end PID calibration - no problems. I think because the Microswiss shroud better directs the fan, the control loop seems tighter than before.PID_CALIBRATE HEATER=extruder TARGET=245...once done, save...SAVE_CONFIG* Changed slicer to 1mm retraction. Haven't tried retraction / stringing tests yet, but no problems with 1mm.* Adjusted Z offsetFirst print benchy came back *perfectly* in PETG. Using stock equipment in the Ender3 pro, PETG was hit or miss.Some observations:* They don't provide a bracket for the BL/CR Touch, so print your own before you tear down your current setup. It should probably be in PETG or ABS for sufficient strength and heat resistance, which is a catch-22 because that is the reason most people switch to an all metal hot end. I would prefer if they included a metal bracket.* Because they reuse many components (both fans, heater element, thermistor), it makes the process much easier, since you aren't rewiring the control board. That being said, be very careful with the thermistor, they are super easy to break.* You might find loading filament a bit difficult. It will operate differently from the stock Bowden setup.Start the extruder turning first, then feed the filament. The gears will grab the filament as they are moving. I have also heard it is helpful to cut the filament end at 45 degrees.Overall, the best upgrade I could imagine. My congratulations to Microswiss on an excellent product!
P**O
Keeps clogging constantly
I have been rebuilding my Ender 3 for a couple of years now so I decided to go ahead and get "the ultimate upgrade" and pull the trigger on the Microswiss NG Direct Drive Extruder. In all honesty, it was a breeze to install, however, the filament keeps getting stuck between the heat brake and the heat block/nozzle. It is a nightmare! I can print for 4 hours very smoothly and out of the sudden, this thing gets clogged. I have tried too many options (bed leveling, retraction settings, temperature, etc) and wasted too many hours printing and trying to get this figured out. Definitely not worth it.
A**R
Excellent, but.
The print head is excellent! However, 400 e-steps is a good place to start. On my Tronxy XY3, I had to set it to 600. I did this by using gcode since I did not have access to the firmware. Where I later learned it is available on Github.Customer service responded to my emails quickly and kindly even when I was getting frustrated on setup. I work with RPET and I was having what I thought was some odd purge issue. I threw my hands up and decided to hit print. The print was the best print I have seen yet. Take the time and make sure you do your printer maintenance.
C**F
Very good, so far
After watching the Youtube video and downloading the instructions PDF from Microswiss, this was quite easy (for me, who is used to tinkering with stuff) to install on the Ender 3 V2. I also installed a dual-Z kit at the same time.I am using the heater block from a Dragonfly BMS so I can keep using my V6 hardened steel nozzles (and my upgraded thermistor); it just screws right onto the heat break, no problem. If you are upgrading from a stock Ender 3, I would be prepared to buy a new thermistor (they can get stuck, and are very easy to break). Microswiss also offers a high-temperature heater block that is compatible with this assembly if you need it, but apparently nobody makes a silicone sock that fits.Be prepared to print your benchies and temperature towers, etc. You might end up needing to change several settings in your slicer.So far:-I have been able to print ASA, ABS, TPU, Nylon, and PLA very successfully. I still need to dial in the Nylon better, but I have everything else pretty much there. I'm also assuming it's going to work very well with the PC, but haven't actually printed with that since the upgrade yet.-To reduce stringing, I found that setting the "Wipe while retracting" setting with 100% "Retract amount before wipe" setting in PrusaSlicer really helped quite a bit. Also, for the TPU I needed to set the extrusion multiplier to 0.9, which also really helped a lot.-If you aren't using the nozzle that MicroSwiss includes, make sure you are using one that's high quality. I think the nozzle I had was not quite 0.4mm, and it really caused problems with the TPU. Don't mix and match either. If you are using the Microswiss heater block the extruder comes with, use an MK8 nozzle unless you like to clean up messes.-I found that I needed to adjust the extruder tension screw out a little further than recommended. With the 2.75mm recommendation for TPU (and the incorrect nozzle size), I got the TPU wrapped around some of the gears, and had to do some disassembly (wasn't too bad, mostly just annoying). I corrected both issues, and actually was able to get some pretty decent quality TPU prints pretty easily (I had never worked with flexible filament before, so I was pretty happy). I accidentally left it on 2.75+mm for the next print, and it handled PLA like a champ as well.-If you are going to be printing filaments that benefit from a hot first layer (like Nylon or ASA), you might also consider swapping to a more powerful 4020 hotend fan (which is inexpensive and fits into the provided shroud with no modifications - just need to make sure you have the correct length screws, since the fan is twice as deep as the stock 4010) to help keep the filament from getting too soft in the heatbreak, mushrooming, and getting stuck. This could happen, for example, if your nozzle is too narrow/partially clogged, your heat management is not correct, etc. If you've ever had issues with heat creep, I think that you should assume that it's going to get worse with the tighter tolerances in this hotend. You can also print custom shrouds - there are a few on Thingiverse - that can accommodate different fans.-Make sure you read the instructions; there are some important tips. If you try to insert the filament the same way you would on the stock bowden drive extruder, it's not likely to be easy for you. However, if you insert it while rotating the filament gently back and forth and then let the extruder pull it through with the gears, then it's far easier to thread than the stock bowden drive. I've had no issues/frustration at all with any of the filaments I've tried since I installed this new extruder.What I would improve if I could:1. It would be nice to offer a version that ships with the upgraded heater block (and a sock that fits) and a hardened nozzle. For my use case, I print a lot with abrasives (glow-in-the-dark ABS, matte PLA), and spend a lot of time on the hotter end of what the "default" heater block/thermistor are really intended for. I don't throw away the softer brass nozzles that come with hot-ends, but I don't ever actually use them either.2. I would add a small knob to the extruder so that you can rotate it manually (when the stepper motor is off). The stock Ender 3 knob kind of fits, but isn't quite right. I'll probably try to print something out in the future.3. Include a mount for the BL-touch and CR Touch (yes, you can print them out but I think most people have already upgraded to a bed leveling probe long before they get around to upgrading to a direct drive, so it would be nice to include).4. Add a few extra drilled holes in the backing plate to make it easier to design mounts for accessories (like filament runout sensors).
Trustpilot
1 day ago
2 months ago