


🔪 Sharpen Like a Pro, Slice Like a Boss!
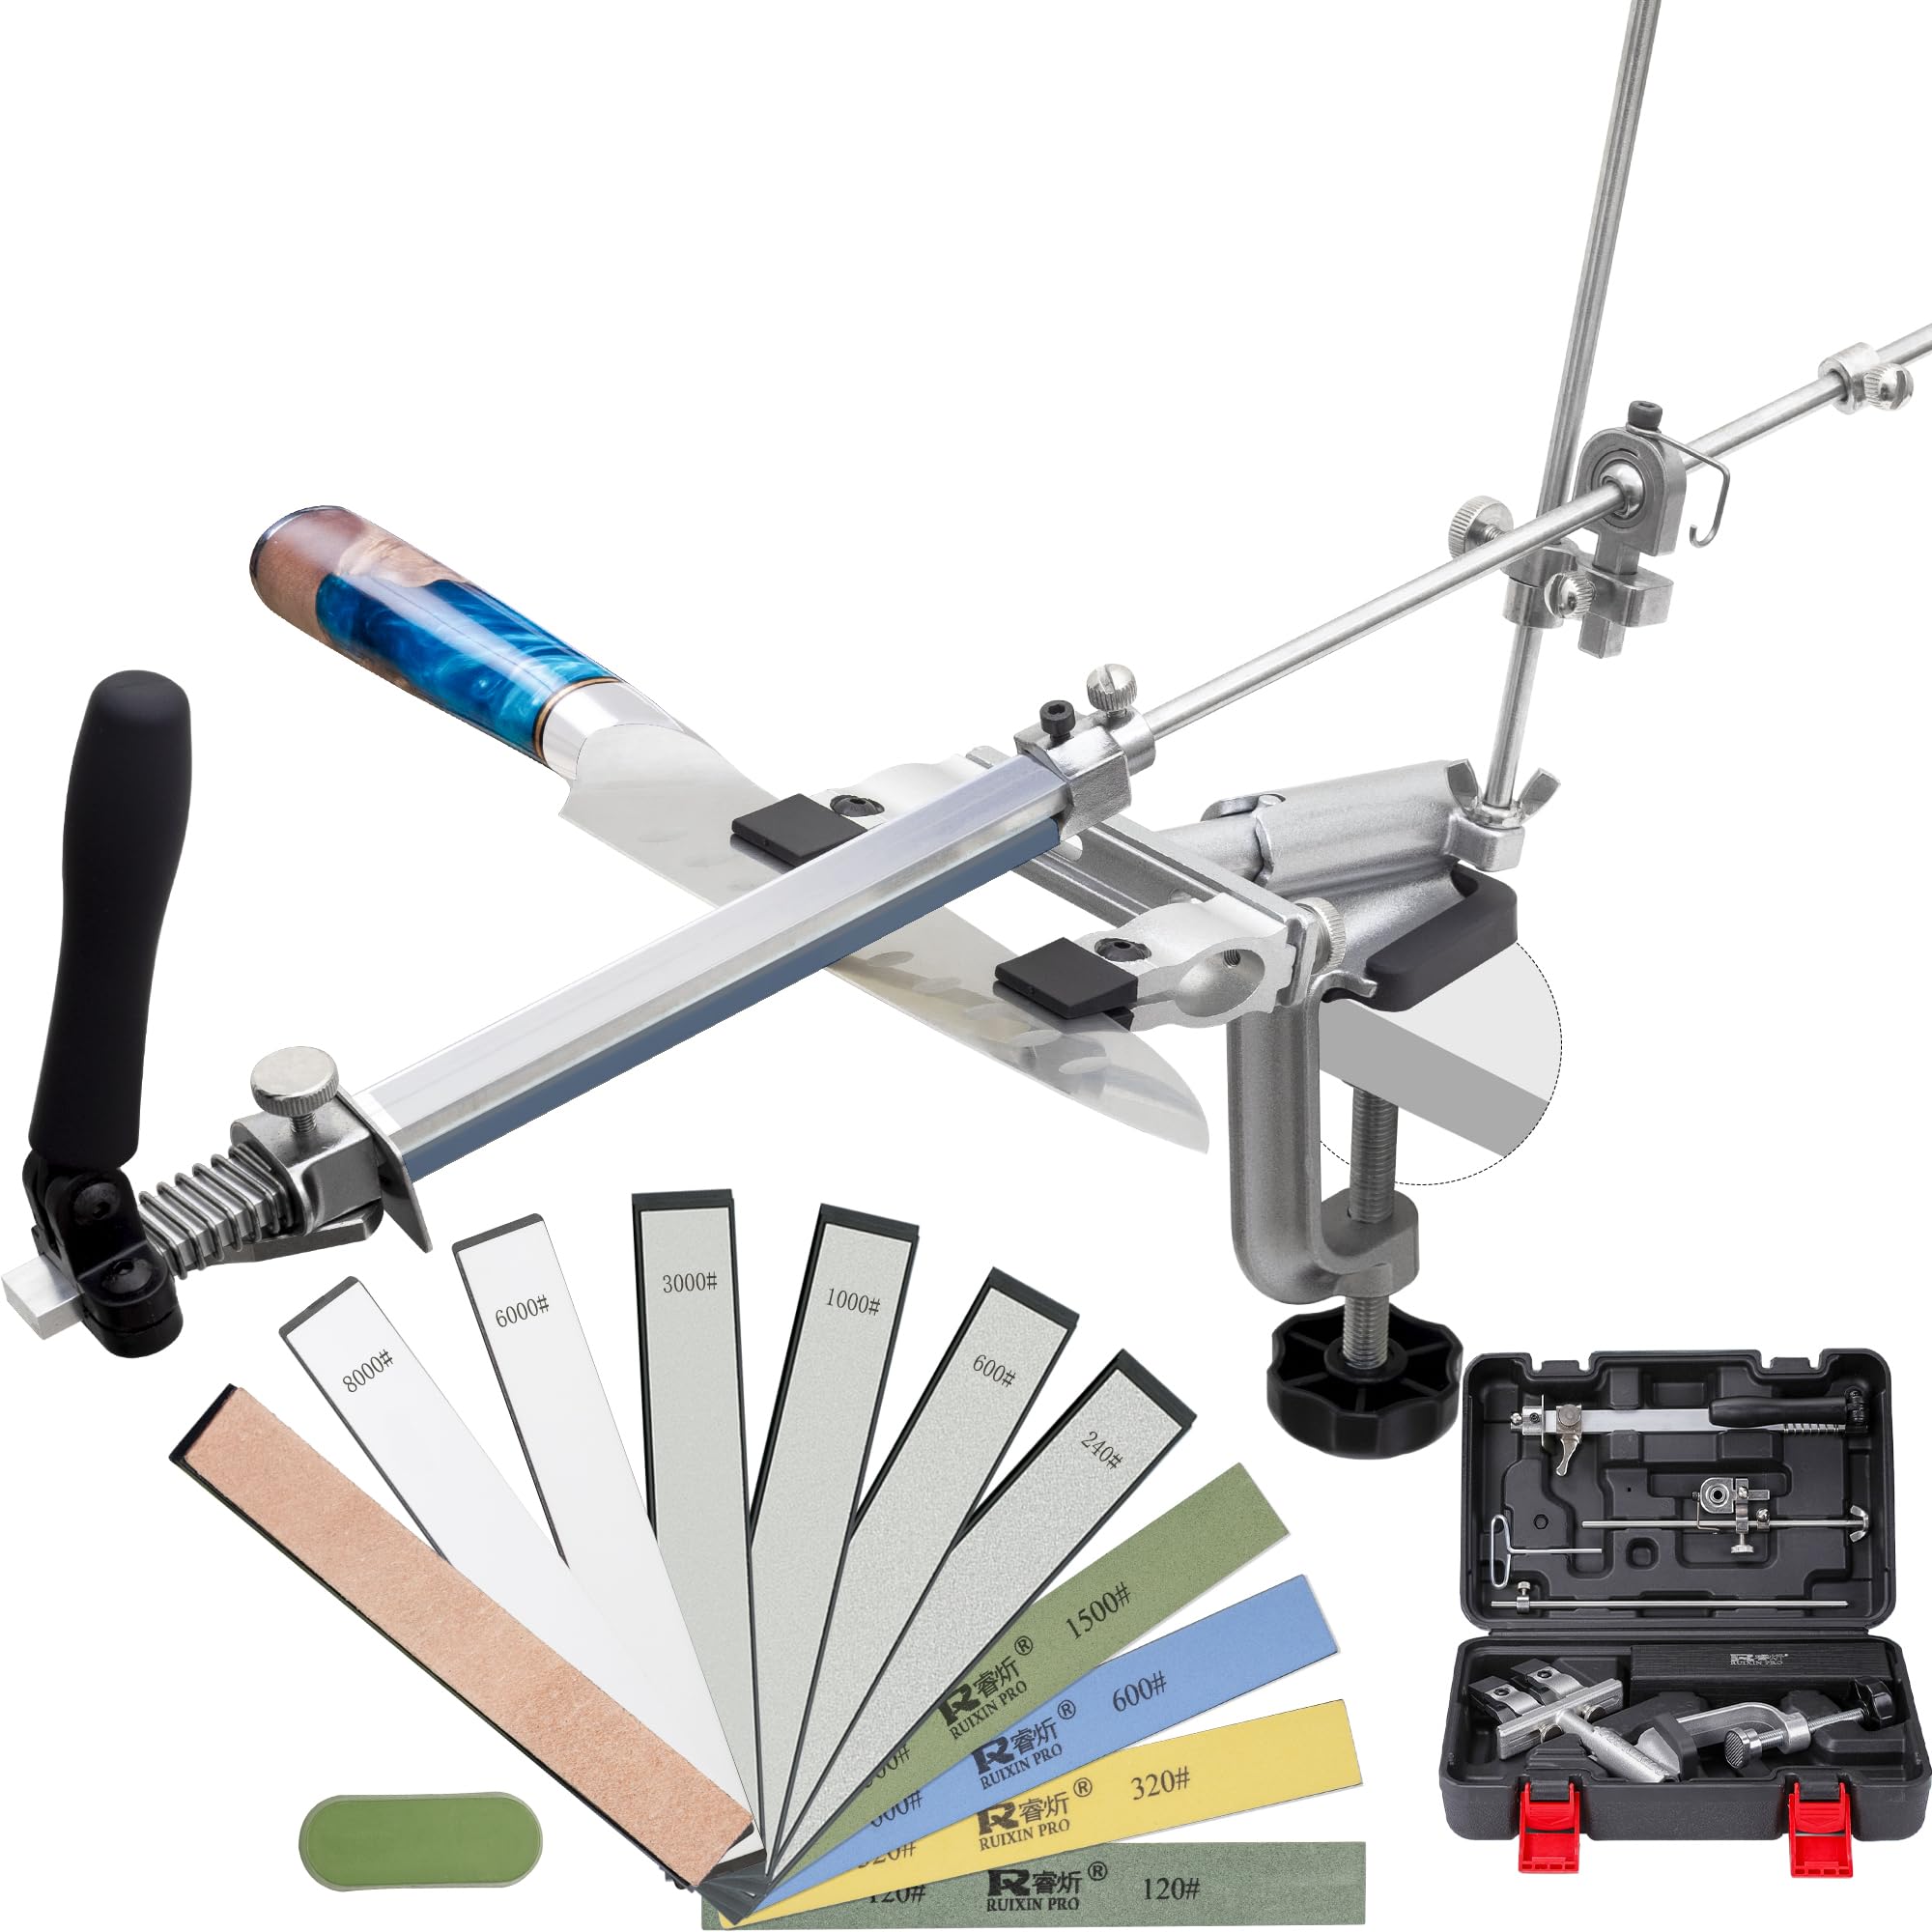
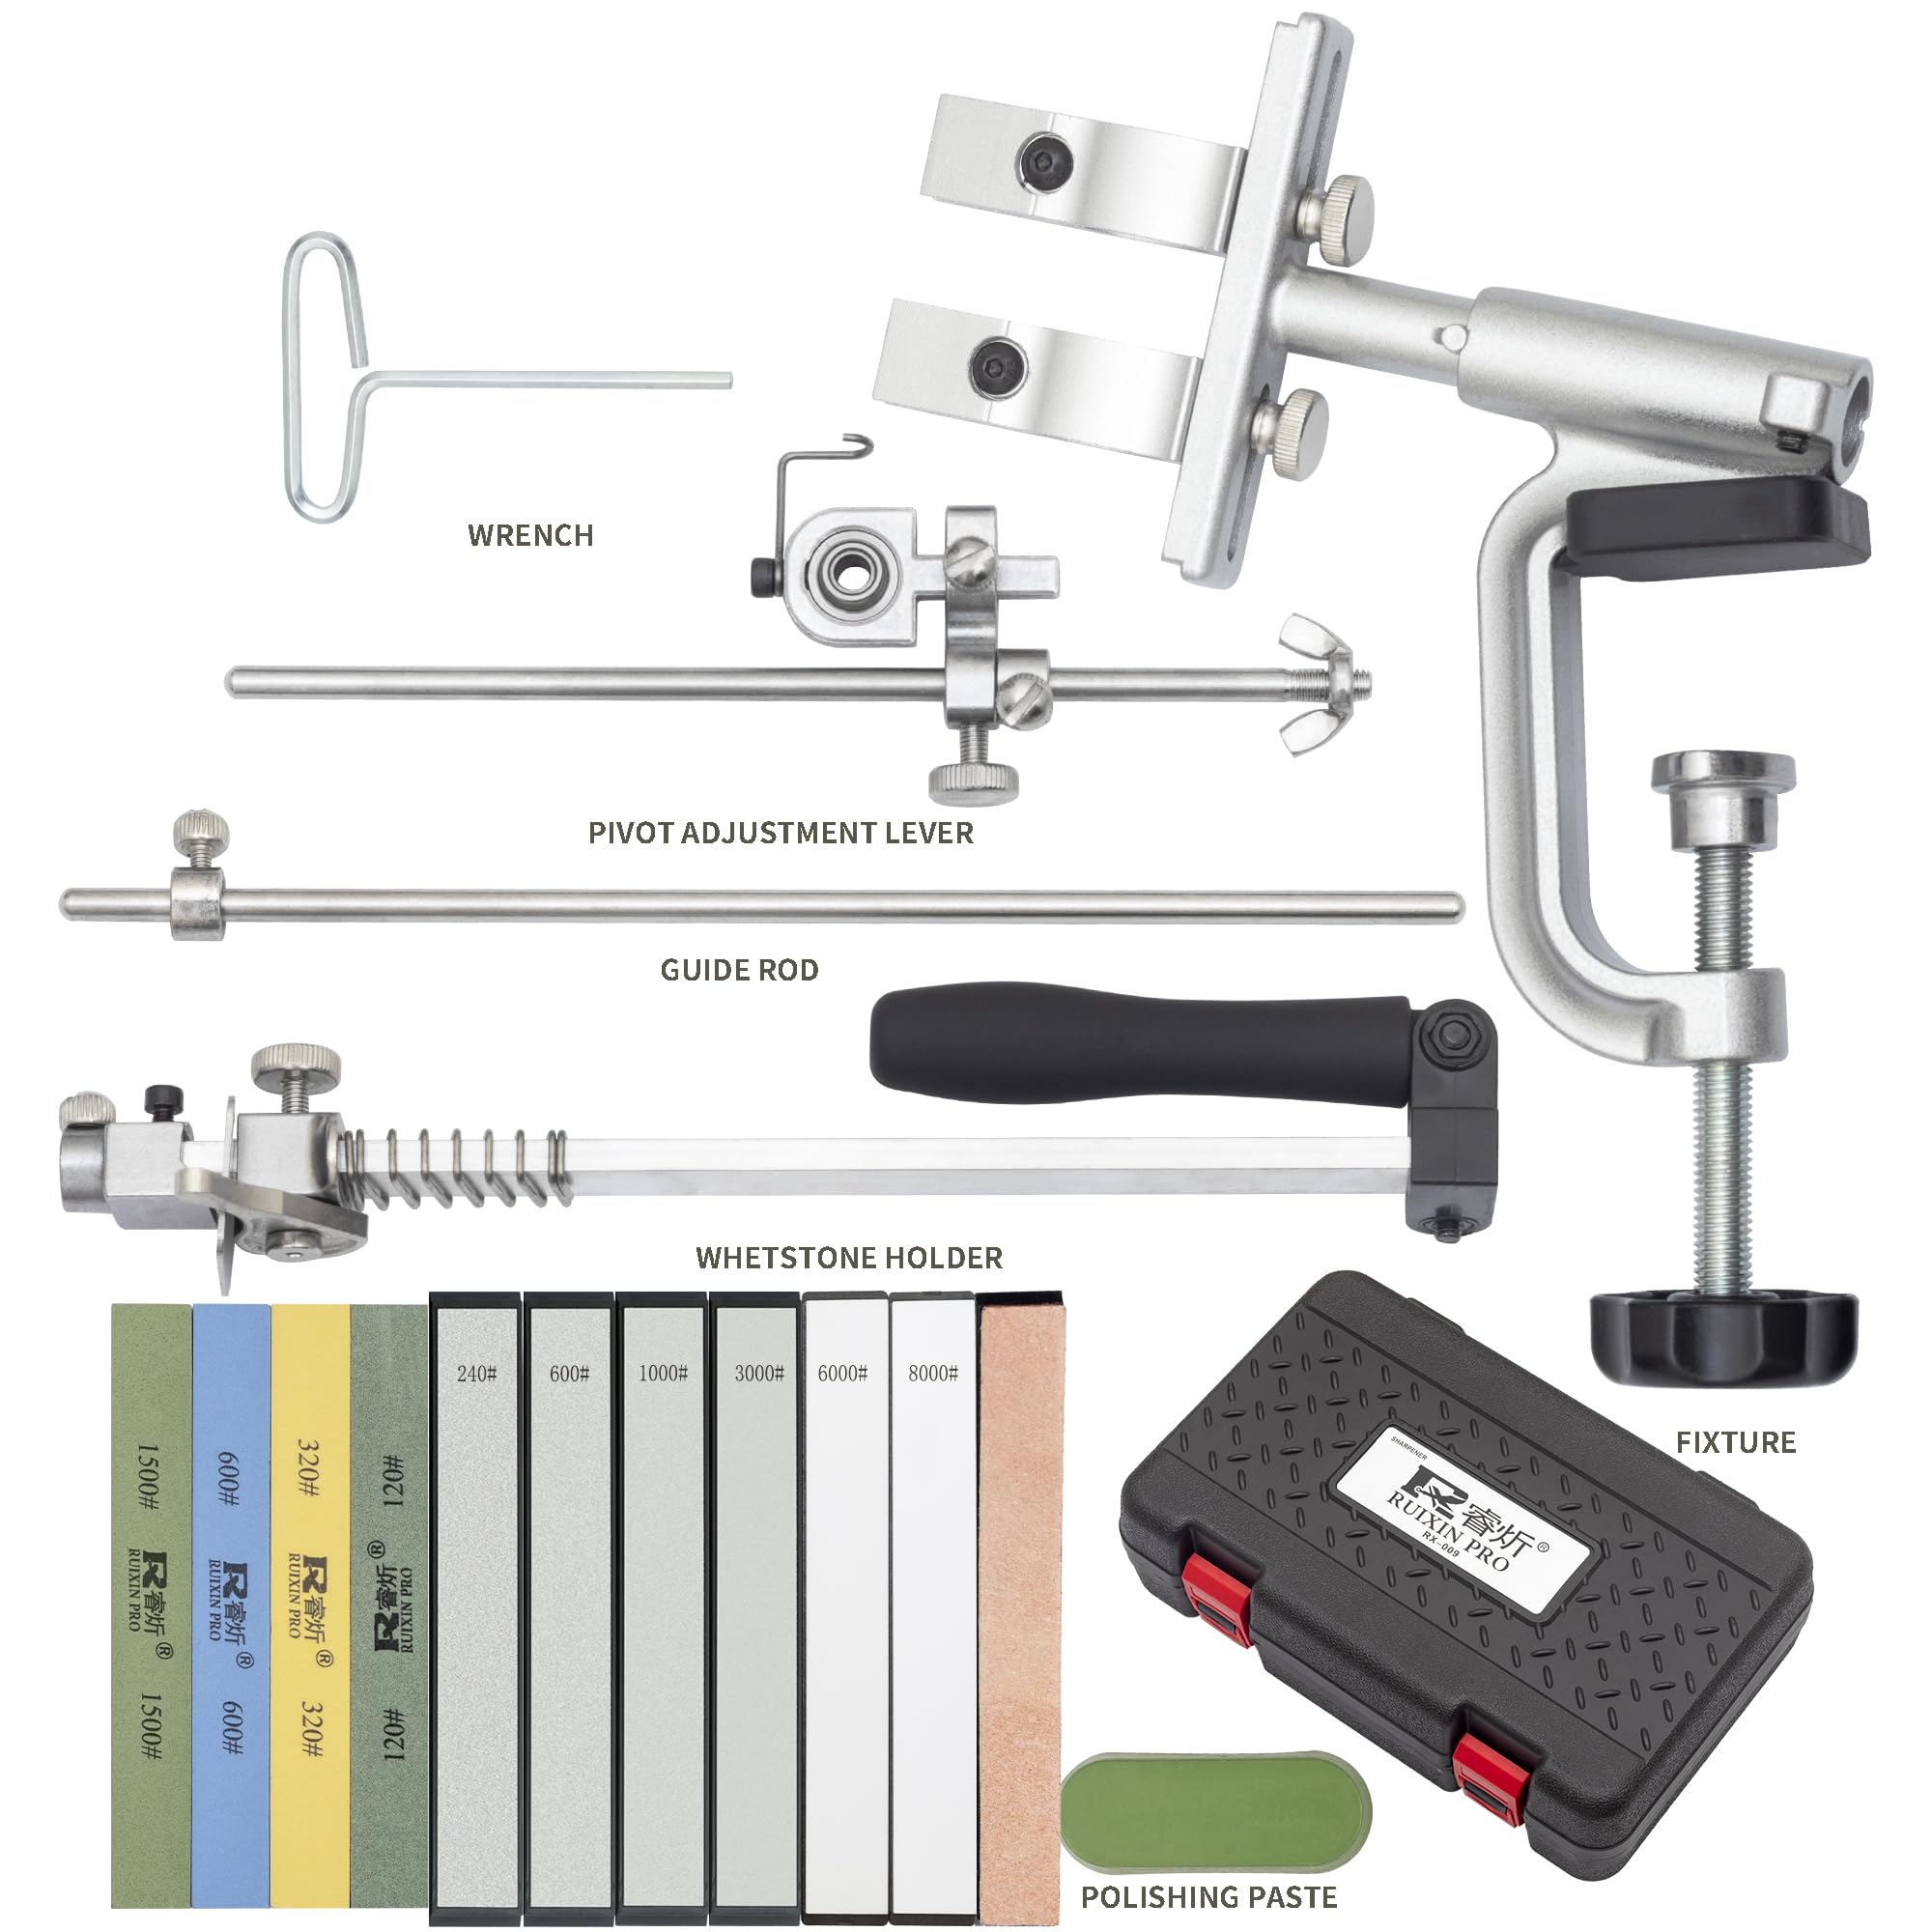
The CWOVRS RUIXIN PRO RX-009 Knife Sharpening Kit features a 360° flip rotation fixed-angle design with adjustable knife-clip, combining 4 diamond and 2 water stones for professional-grade sharpening. Its secure G-clamp and safety handle ensure injury-free use, while compatibility with a wide range of knives makes it a versatile essential. Packaged in a premium carrying box, it’s the perfect gift for culinary enthusiasts and professionals alike.


C**S
Tips and fine tuning the Ruixin PRO RX-008 setup
First I want to mention Anny with Cruitech customer service was very responsive and went way above and beyond to take care of the issues I ran into with the order of the kit. I was missing a rod stop, the 10K stone was scratched and the leather strop was not flat with glue coming undone. She sent me an entirely new kit free within days and told me to keep the kit I have. Like I said, way above and beyond!I watched countless videos and read as many reviews I could find of all the different popular sharpening systems. At the end I chose to purchase the Ruixin PRO RX-008. Going the Ruixin PRO RX-008 route was not because of the cost (although it was a factor), it was the flexibility of the system. I sharpen mainly mid to high end pocket knives, including Karambits. I have so far sharpened 8 knives. All to razor sharpness. Once one understands the system, it is highly effective and as easy to setup and use as can be. The caveat is the user must still understand what is an apex of an edge and the basics of blade sharpening.I have owned a couple of other well known systems including KME and Apex Pro II which are all in storage now. So here is what I have learned and how I improved or tuned the system:* The Ruixin PRO RX-008 is well known to change the angle when you rotate the blade 180 degrees. Mine from factory was 1.5 degrees off when rotating the blade. After the fix below it is now 0.1 degree off. I needed 7 layers of tape to achieve this accuracy when rotating the blade. The fix is...1) to place layers of thin strips of electrical tape on the bottom side behind the bolt holes. I included a pic. Once you have gotten close to perfectly the same angle when rotating the blade leave the bottom plate Philips screws tight and never loosen again. Not necessary to adjust again or loosen screws once you have it all setup.2) When placing blade in clamp, only place the flat part of the blade by the spine into clamp. Look at pic provided.* Another complaint by users is the connections in the system loosen during use. Yep if you follow the assembly instructions this will happen. Here is the fix...1) For the blade holder, use one of the rod lock clamps (this is what I call it). See pic.2) Tighten all connections with pliers. For the guide rod ball use the Allan head bolt, tightened with a Allan head wrench. Do not bother using that cheap one you get with kit.* The clamps have grooves to hold blade in place. Use painters tape like in provided pic to prevent marring of your blade.* I use diamond plates purchased on Amazon. They are called Value Pack diamond stones/plates. Were $25 for 10 of them ranging from 80 grit to 3000 grit. Works like a champ, have rounded edges and so far do not visibly see any wear on them. I also use the included three polishing natural stones that come with the kit, which also work really well. If you use the synthetic stones or natural polishing stones you must keep them wet with water otherwise you will wear them really fast and they will be inconsistent. Also round (get rid of the sharp edge) the edges of the synthetic and natural stones otherwise you will scratch your blade. This can easily be accomplished by laying a piece of wet/dry 150 or 180 grit sandpaper on a flat surface. Then with wet stones lightly rub the edge only over the sandpaper.* If installing the large C-clamp on glass, marble or smooth surface. Use a piece of rubber between the bottom of the clamp and clamping surface like in the provided pic. Very solid, nothing moves during sharpening and polishing.* There is a attachment that goes over the rod that holds the guide rod ball. It is a bar with a hook that you can move the guide rod that holds the stone or plate and rest the whole bar on. This is so the rod is out of the way while you are rotating the blade, inspecting it or whatever. I purchased mine from China (Ali-X) but also can be purchased on ebay and I think Amazon. Costed me $2.60 shipped, get it, super handy.* The guide rod ball is made from nylon or some kind of plastic. This can be replaced with a stainless steel ball that has tighter tolerances that eliminate the play that is inherent to the nylon ball. Again another few dollars. Will last longer than nylon ball and improves the precision of the system. I paid $8.60 shipped for this.* Recurve blades and Karambits can be sharpened with this system. But you will need to purchase rods that attach to the guide rod that hold the stones. I purchased diamond rods at $5 a piece for the varying grits I wanted. Can get from 80 - 3000 grits. Again Ali-X or possibly Amazon might also offer them.* The key to a fixed angle sharpening system is consistency. After rotating blade and angles are consistent, all the pieces of the system stay locked into place and do not come loose, then it is consistency with technique. I have watched countless videos where the user would basically sharpen the blade in a sawing up and down motion inconsistently across the blade. I have no idea as to how removing different amounts of material from different sections of the blade gives a consistent result. What works for me and provides 100% consistent results is...1) to start from the heel of the blade and work toward the tip. This is a slow-ish stroke using only the weight of the plate and plate arm. Especially with diamond plates, they cut fast, very efficient.2) Using whatever grit I want start with (depending on what I am trying to accomplish), 10 passes on one side, then 10 passes on the other side. I feel for a burr. If no burr I just keep at this until I can get a consistent burr across the blade. Then rotate and do the same. Always even amount of strokes on each side of the blade. Once I get a burr to form consistently across the blade on both sides, then lower the amount of stroke passes on each side, then I move on to a higher grit. If an area on the blade needs a little more I will give just that area more attention and then a full stroke across blade. While using the technique outlined above is not the fastest but will get consistent and great results. Using the technique above also eliminates any movement/vibration within the system.3) After every full rotation of the blade lightly wipe both sides of the blade with a clean soft cloth to remove metal that may scratch your blade or interfere with the sharpening or honing process.4) To really be able to feel how sharp your blade is during sharpening and honing and to get the best result I learned this from a knife maker... After each grit before proceeding to the next grit stage use the edge of a piece of cardboard or cork and lightly run it from heel to tip of blade twice to loosen or remove the burr on the blade edge. What you feel now is the edge you have.5) Another key to a sharp blade is the lowest grit, or first grit used you need to form the edge. If a consistent burr is not formed on both sides of the blade during this sharpening stage you have not formed an edge. Any further honing of the blade is just a waste of time unless a edge is formed at this stage!* Ok last tip I can think of off the top of my head. I am able to get mirror finished edges, razor sharp. To take it a bit further stropping is needed. The leather strop plate that comes with the kit is crap. This will roll and dull your refined blade. If you want to finish the honing and polishing steps by stropping and want to not change angle or take it to a manual or typical strop I figured out a way... Take the useless, uneven, cheap leather strop that comes with the kit and sand the leather flat. I used 400 grit wet dry, placed it on top of a glass surface and turned the plate with the leather facing down. Sanded the leather until it was flat. Then using Scotch double sided tape and the cardboard from the backing of a notepad on top. So the cardboard is the top layer, then the double sided tape and then the flattened leather strop. Used 0.5 Micron compound (green) purchased from Amazon (Taytools 1.2 Ounce Bar Green Chromium Oxide Micro Fine Stropping Polishing Compound 0.5 Microns or 60,000 Grit) purchased for $7.64 shipped. See pic included. The key here is the strop will be firm and slightly shorter in height than the stones or plates being used before it. This prevents the strop (usually softer and leather) from rolling the edge. Also the strop plate is shorter in height which automatically lowers the angle slightly making sure the edge angle is not effected. I found best results are to just make stroke passes again from heel to tip along the blade edge. This works like a champ and saves time.In summary this system works really well. Does need some tweaking but I expected nothing less, especially for $55 with tax and shipped. I am really glad I made the purchase. Hopefully this helps someone ...
J**H
Great sharpening system, with upgraded stones and mods
I bought this system looking to upgrade from a knock-off Edge Pro that I use. This system is much better. I take it that it is something of an adapted KME knock-off. The clamp and swivel mean that you can carefully sharpen both sides of knives with your dominant hand, keeping the angle totally constant. For me, this is a huge step up from the Edge Pro I was using which did not clamp the knife and required me to sharpen one side with my non-dominant hand. It took me about 45 minutes to sharpen three pocket folding knives to shaving sharp--to 1000 grit stone then stropping with 1.0 micron and 0.5 micron kangaroo leather mounted on an Edge Pro blank. Be aware that you absolutely need to invest in high quality stones. Don't even think about using the stones that ship with this sharpener, they are complete trash and will disintegrate if you try and use them on any knife that is made of decent steel. But you don't buy this sharpener for the stones, you buy it for the sharpener itself.Edit after about 6 weeks of use: I still think this is a good value sharpener that you can get excellent and consistent results from. However, I have two points to add and I took one star off my rating. First, you need to be careful when you clamp your knife in so as to make sure that the grind angle is consistent on both sides. There are two sets of screws which control the clamp. I keep the regular phillips screws tightened all the way and use the hex screws to clamp my blade, careful to tighten this down on either a flat part of my blade or, if the blade has a full primary grind (like on a Spyderco) I am just careful to make sure that the apex of the blade is kept at a constant angle when you flip the knife. Obviously, as others have noted, you need a way to measure the angle. I use an app on my phone. Second, I ended up modifying the clamp with a dremel cutting wheel. I think the clamp is too wide. It would work well for kitchen knives or other larger blades. However, I am mainly sharpening folding pocket knives and the clamp was simply too big. So I cut cheeks out of it to more easily sharpen smaller blades (see pics).My conclusion: you can get excellent results from this sharpener but you need to use common sense, buy high quality stones, and maybe modify it for your uses.
J**N
Sharpest my knives have ever been
Was a little skeptical at first, set up works great though! I used the diamond stones and my chef knives have never been sharper! The design takes a minute to get used to but once you get the movements down it sharpens quickly and efficiently! Great sharpener for a great price just make sure to get the diamond stones.
D**D
Stones are trash but the diamonds work well
TLDR: this works well enough for a few knives but durability is a problem. You need a separate way to measure the angles.Tried it out on a filet knife and a 10 inch chefs knife. Both ended up razor sharp but when I used the 1500 grit whetstone it nearly disintegrated after one knife. I soaked it and used minimal pressure like the instructions say. The diamond stones seem to work very well. We'll see how durable they are. The high grit ceramic stones also seemed to work very well but got very clogged very quickly.
D**N
Sharpens to a razors edge!
This system definitely has a bit of a learning curve if all you're familiar with is flat stones. Once I got the hang of it, I sharpened every knife I own to a razors edge. Showed some guys at work and suddenly spent 2 days sharpening everyone's knives. Great buy at a great price!
Trustpilot
4 days ago
2 months ago

